Sellers and Teams
With Raffle Rocket’s Sellers and Teams functionality, you can get your group involved in selling and promoting your raffle. Utilizing this feature is a great way to boost sales and promotion, which will help you earn more.
Depending on how your organization is structured, you can set up both teams and sellers or use sellers on their own. Below are some additional details on each setup scenario to help you determine which option would work best for your organization:
Teams and Sellers
Setting up both teams and sellers is recommended for organizations with multiple teams or groups participating in the same raffle.
For example, a sports association with multiple teams can upload all players as sellers and assign them to their respective teams (e.g., U12 Boys, U14 Girls). This allows the association to track sales by individual seller and by team, providing insights into how these groups are performing.
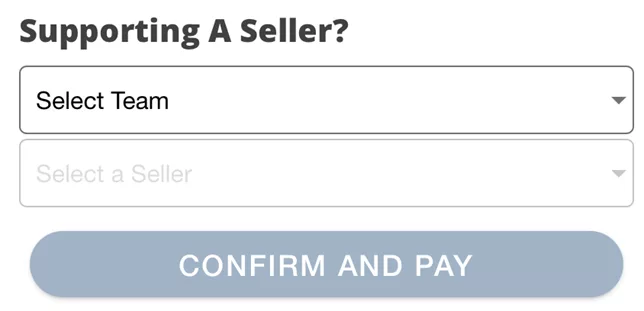
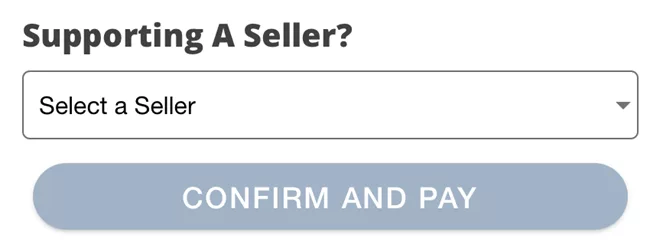
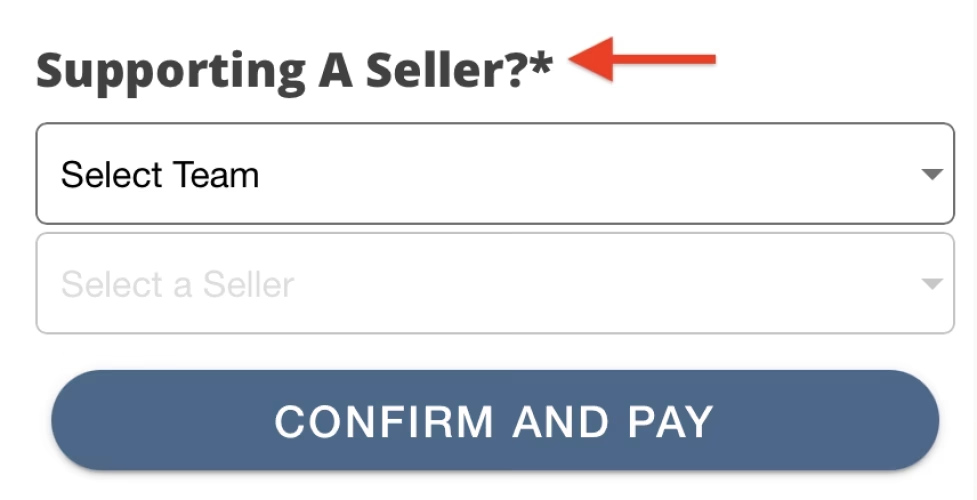
At checkout, a Supporting a Seller? dropdown will be available for purchasers to select the team they would like to support and then choose the individual player (seller) within that team.
Sellers Only
Organizations can also choose to only upload a list of sellers without grouping them into a team. This setup is recommended for organizations that only have a single team or group participating in the raffle.
For example, if a single U9 sports team is running a raffle, the players can simply be uploaded as sellers without creating a U9 team. This helps streamline the checkout process for purchasers as they would only be prompted to select the individual player they would like to support from the Supporting a Seller? dropdown, rather than having to select the only available team before choosing the player.
With either setup, sellers can also receive a unique URL to share, allowing the seller’s name to be automatically pre-selected at the checkout screen when used to purchase tickets.
Tip: To increase sales and spark some friendly competition, consider rewarding the teams or sellers that drive the most sales!
Getting Started with Sellers
Navigate to the Sellers & Teams tab in the Raffle Rocket dashboard and click on the Sellers segment.
Sellers Table Overview:
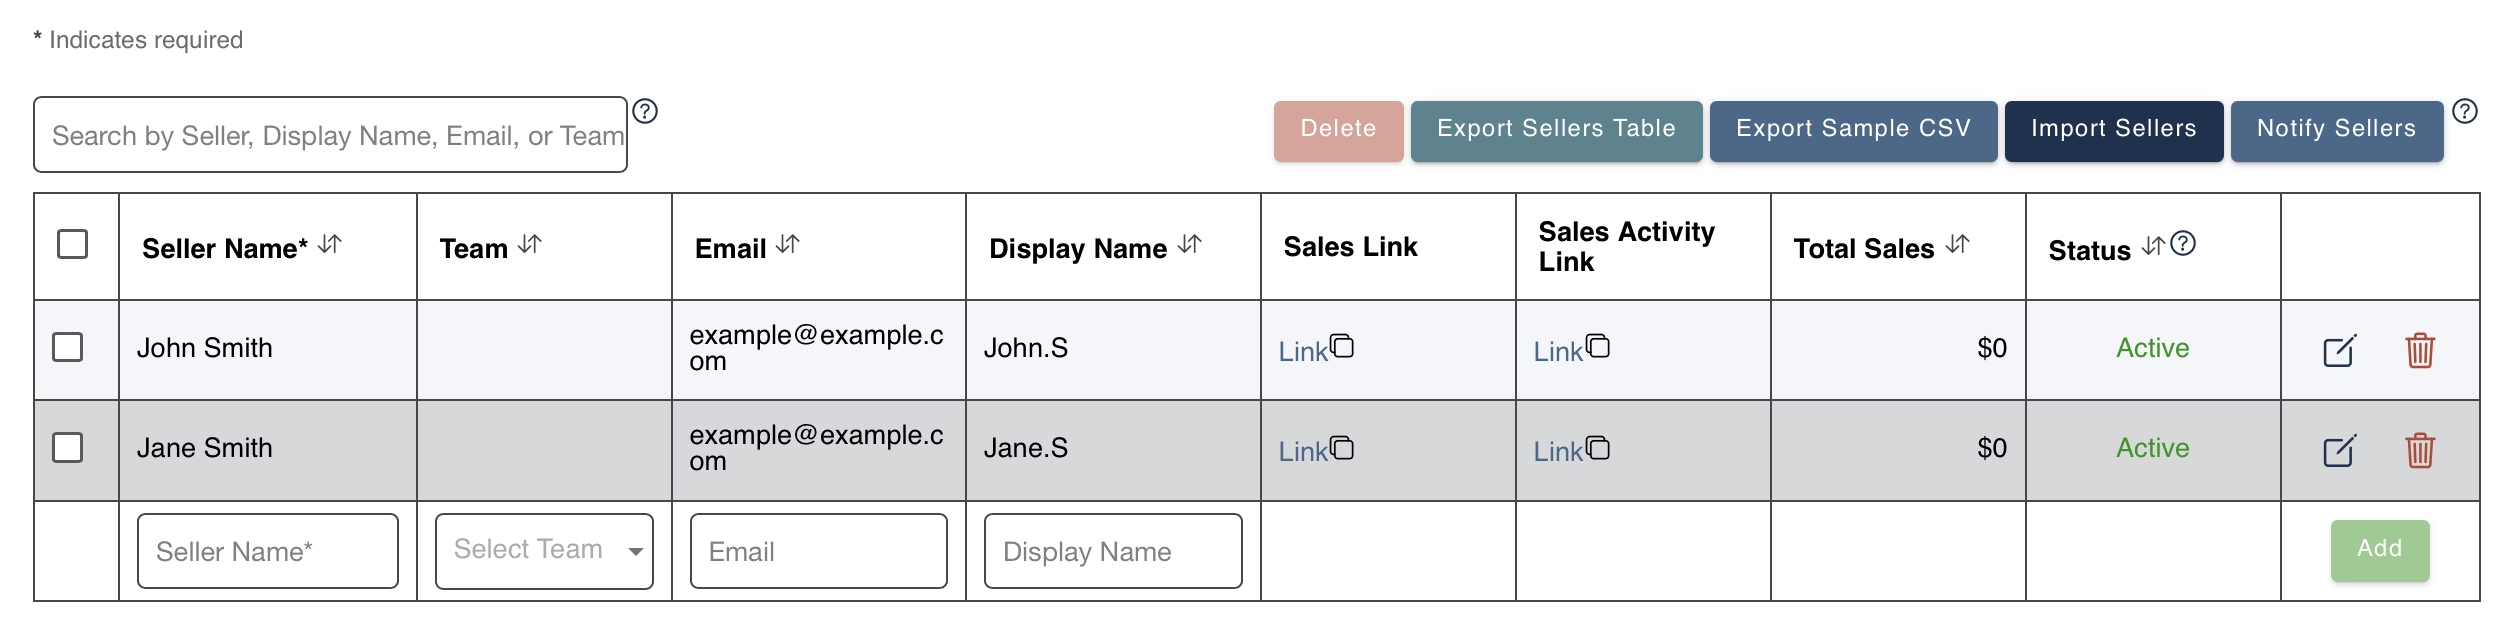
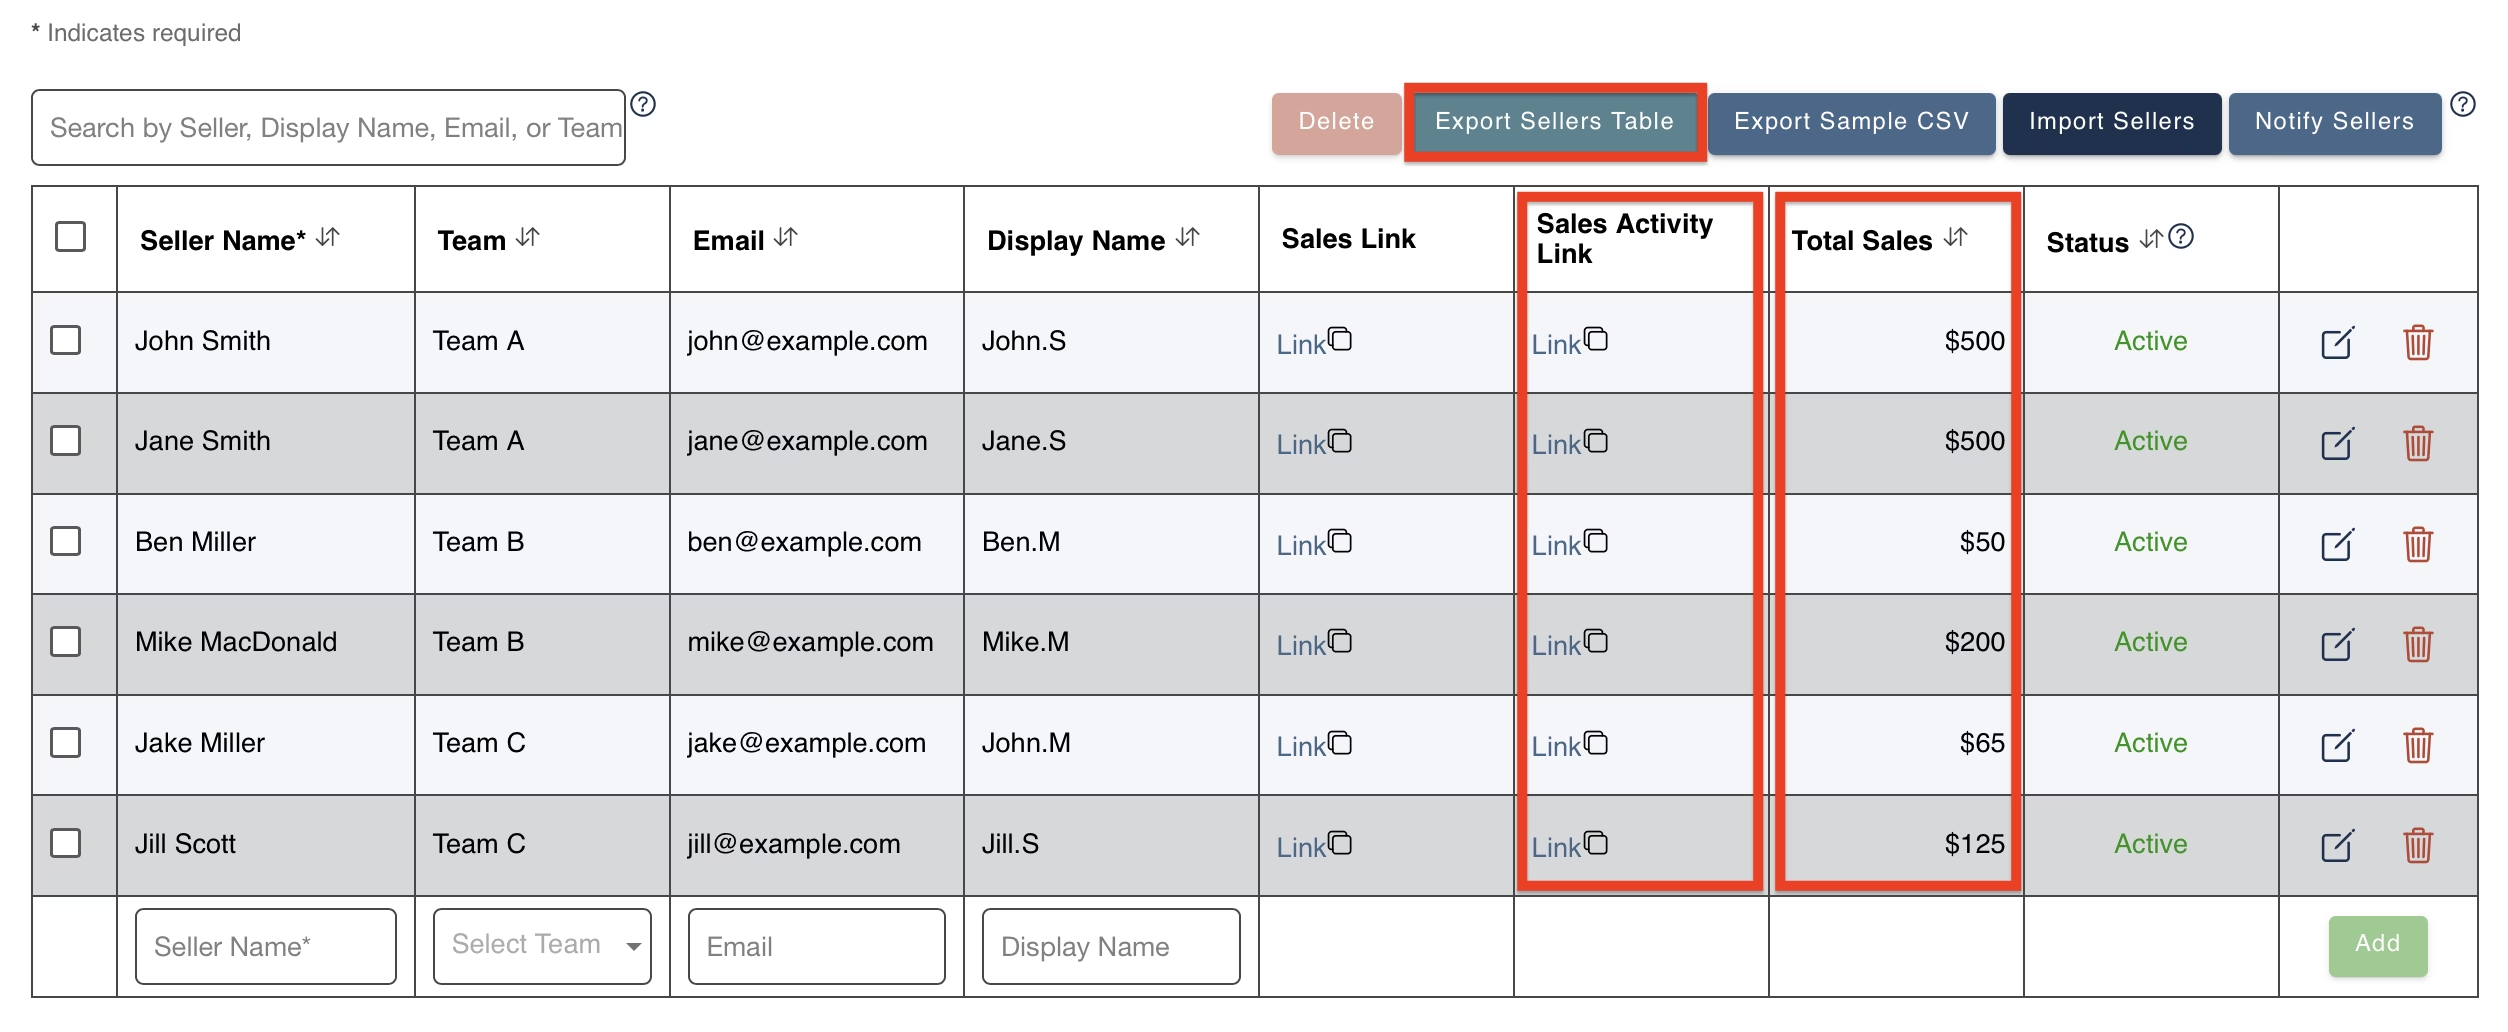
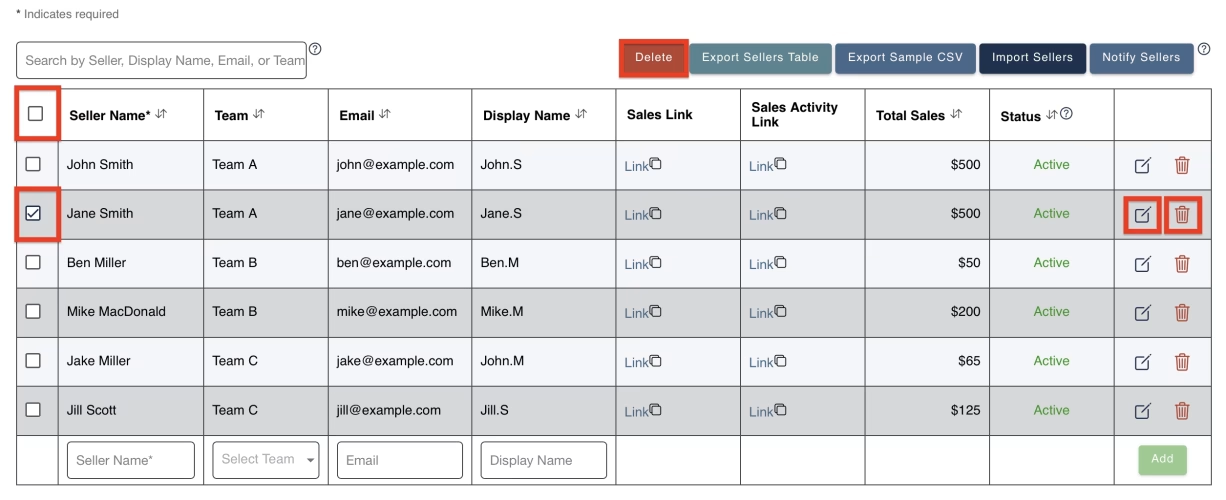
Each row in the Sellers Table displays the following:
- Seller Name: The name of the seller.
- Team (optional): Assign this seller to an existing team or create a new one. If you are not using Teams, leave this field blank.
- Email (optional): This will allow the seller to be emailed their unique sales link to share with their network and private sales activity link to track their progress.
- Display Name (optional): Enter a unique name that is different from the Seller Name and will be displayed to purchasers within the Supporting a Seller? dropdown.
- Sales Link: A shareable link that is automatically generated once a seller is added. When this link is followed by a purchaser, the seller’s name will be pre-selected at checkout.
- Sales Activity Link: A private page sellers can visit to track their sales activity. This will allow sellers to view their total raised, total purchases, and who supported them.
- Total Sales: The total sales attributed to the seller.
- Status: Indicates whether a seller is currently ‘Active’ or ‘Deactivated’. Purchasers can always support an active seller. If a seller is deactivated, no new sales can be made in support of them, but all previous sales associated with that seller will remain.
Adding Sellers
There are two methods for adding sellers to a raffle. See below for more detail.
Method 1: Manually Add Sellers
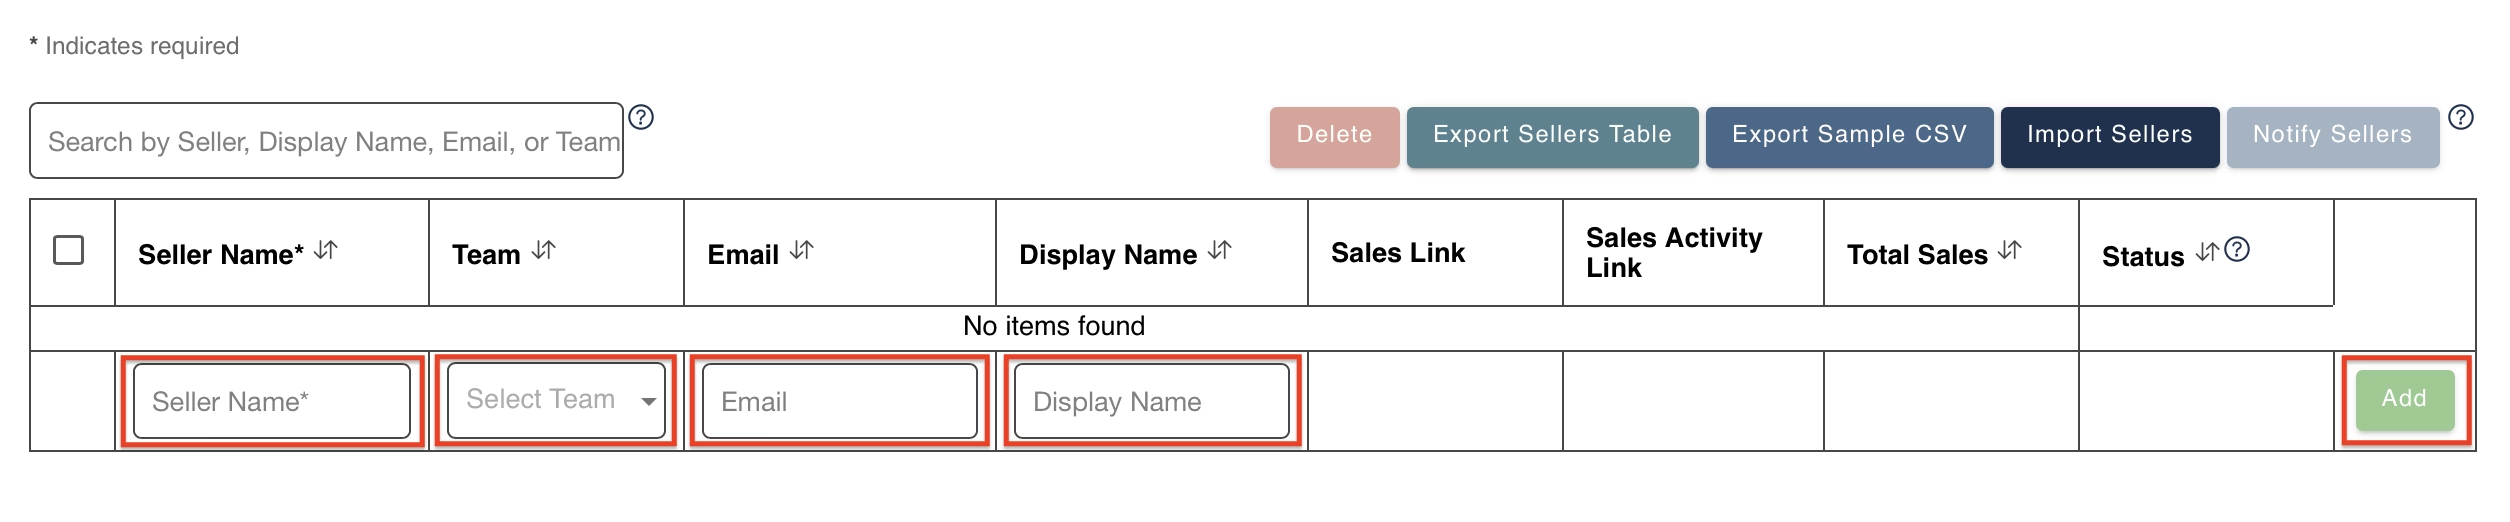
In the Sellers Table, fill in the required field, Seller Name, and then any of the optional fields, Team, Email, and Display Name. Once entered, click Add.
Method 2: Import Sellers (Bulk Upload)
If you have multiple sellers to add, you can save time by importing them using a .CSV file.
You can download our .CSV sample file via the Export Sample CSV button. This step is optional, but it’s a helpful way to view the correct formatting and use it as a starting template for building your seller list.
*Note: When using an Apple device, the Sample CSV will likely open in the Numbers app. Prior to importing your completed seller list, please ensure it is saved as a .CSV file, as Numbers does not do this automatically.

To successfully import your sellers, there are a few requirements that the file must follow.
- Column Requirements: The following column headings must be included and in the correct order: Seller Name, Team, Email, Display Name. Keep in mind that Seller Name is required; everything else is optional and can be left blank.
- File Requirements: Only .CSV file types can be imported, and each .CSV file cannot exceed 1,000 rows.
Once your .CSV file is ready, you can begin the import process. Follow the steps below to import:
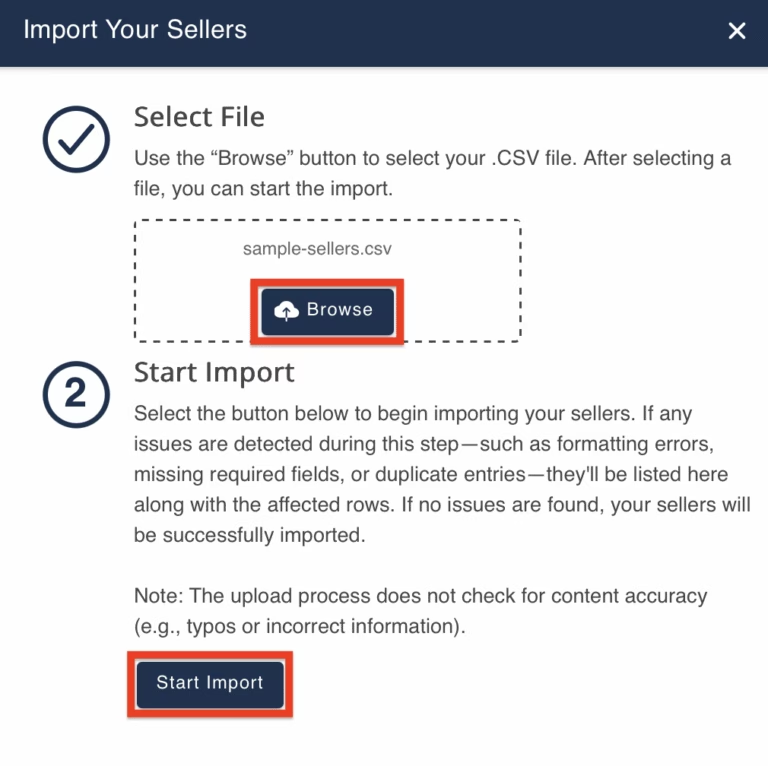
- Select the Import Sellers button
- Click Browse to upload your .CSV file
- Click Start Import to begin the upload
After the import process is finished, you’ll be prompted to review the results, which will vary depending on whether the import was successful or not.
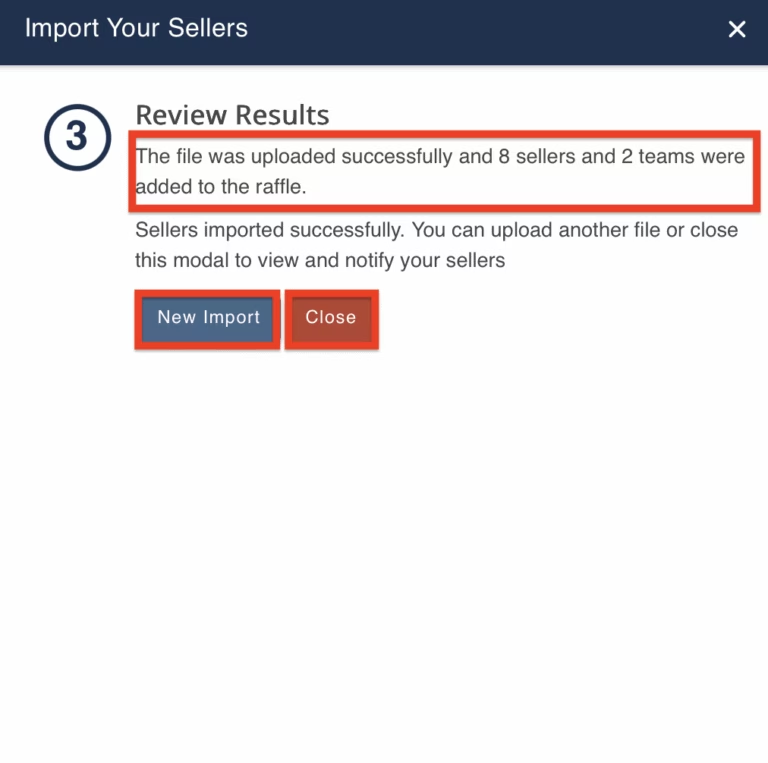
- Import Successful: You will see the number of sellers and teams added. You can choose to close the window or import another .CSV file.
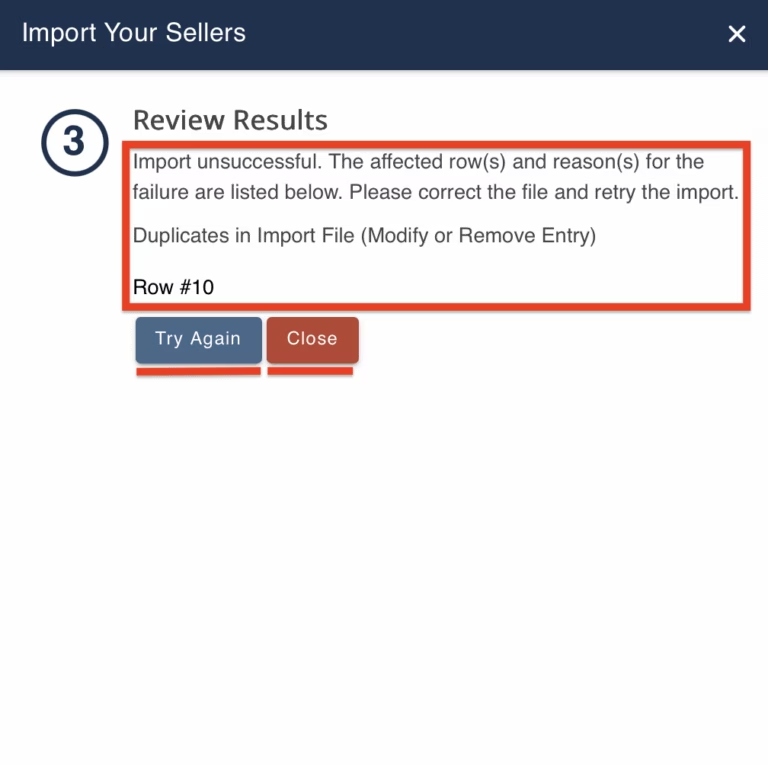
- Import Failed: If there are validation errors, the entire .CSV file will be rejected, and no sellers will be imported. You will be notified of the reason(s) for failure so you can make the necessary changes and try again using the Retry Import button.
Why Did My Import Fail?
Below are the common reasons for import failure and how to resolve them:
1. Incorrect column order
- To resolve: Ensure your file has the necessary column headings and that they appear in the proper order (Seller Name, Team, Email, Display Name).
2. Missing Seller Name field
- To resolve: Replace any blank cells within the Seller Name column with a name or remove the entire row if it was added by accident.
3. Incorrect Email format
- To resolve: Confirm the format of the email(s) matches the standard [email protected].
4. Character limit reached per column
- To resolve: Update any fields that exceed the column’s respective character limit. Limits for Seller Name, Display Name, and Team Name are below for your reference.
- Seller Name: 30-character limit
- Display Name: 20-character limit
- Team Name: 30-character limit
5. Duplicate entries found within the imported file
- To resolve: Update the information within the affected row so it doesn’t match any other rows in your file or delete the entire row from your .CSV file.
6. Entries found within the imported file match an existing seller within your raffle
- To resolve: Update the information within the affected row so it doesn’t match an existing seller in your raffle or delete the entire row from your .CSV file.
Notifying Sellers
Above the Sellers Table, click the Notify Sellers button to email each seller their unique Sales Link and private Sales Activity Link. Sellers can share their Sales Link with their network and use their Sales Activity Link to monitor their progress.
Important Notes:
- Sellers will only be emailed once, so if you notify existing sellers, and then add more later, only the new sellers will be emailed when you notify again.
- If a seller’s email address is updated after they have already been notified, you will be able to re-notify that seller.
- Deactivated sellers will not be notified.
We recommend waiting to notify sellers until your raffle is Live. If sellers receive their Sales Link when the raffle is still in Draft, there is a possibility it could be shared with purchasers before the sales period begins.

Tracking Seller Performance
Seller performance can be monitored in four ways:
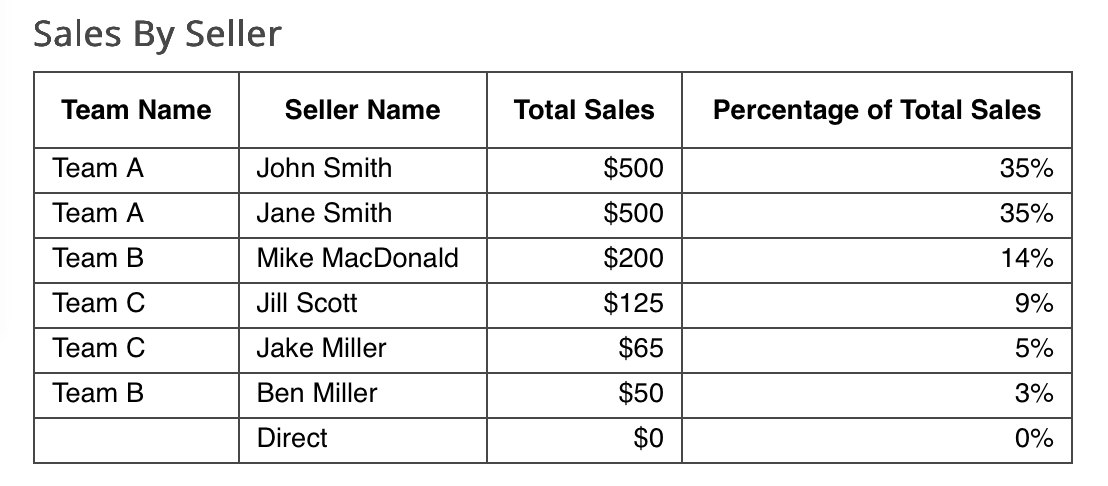
- On the Overview tab, view the Sales by Seller.
- On the Sellers & Teams tab, select the Sellers segment, then view the Total Sales column within the Sellers Table.
- From the same Sellers & Teams tab, select the Sellers segment, then click the Export Sellers Table button. All the information shown within the Sellers Table will be included in the export.
- From the same Sellers & Teams tab, select the Sellers segment, then select a seller’s private link from the Sales Activity Link column. This sales activity page is designed for sellers to privately view their activity and who has supported them. While it is accessible to both the designated seller and the raffle admin, it may be more efficient for admins to monitor seller sales using one of the above methods.
Displaying a Seller Leaderboard
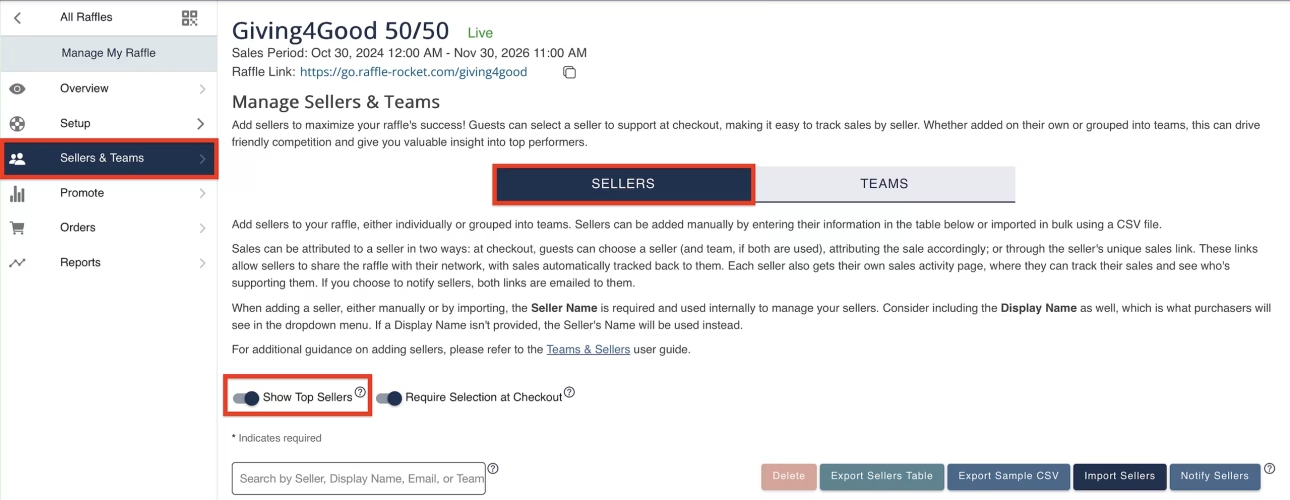
You can choose to have your sellers and their progress publicly displayed on the main raffle page through a leaderboard.
To enable this, navigate to the Sellers & Teams tab, select the Sellers segment, then toggle ON the Show Top Sellers setting.
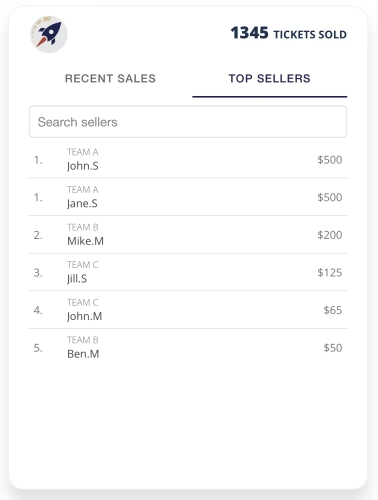
Once enabled, sellers will be displayed on the main raffle page, ranked in the order of who has raised the most.
Important Notes:
- Sellers with the same total raised will share the same rank.
- The leaderboard is based on individual seller sales. If teams are configured, overall team performance will not impact the leaderboard.
- While team configuration does not impact the leaderboard, if a seller is assigned to a team, their team name will also be displayed.
Requiring a Seller at Checkout
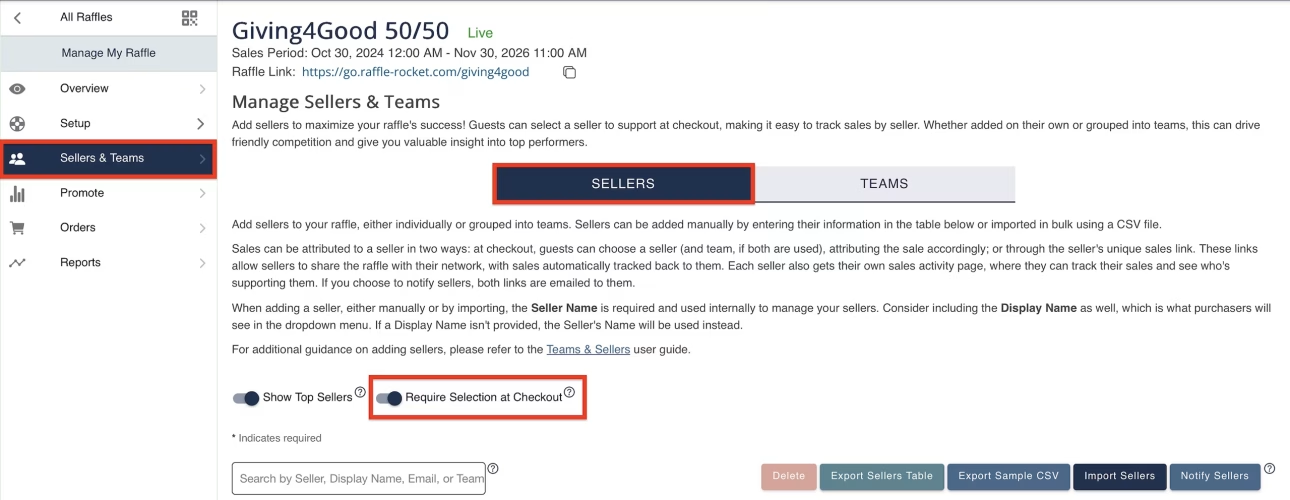
Ensure all raffle sales are made in support of a seller (i.e., there are no direct sales made to the organization).
To enable this, navigate to the Sellers & Teams tab, select the Sellers segment, then toggle ON the Require Selection at Checkout setting.
Once enabled, all purchasers will be required to select a seller to support before completing their purchase. If both teams and sellers are configured, purchasers will be required to select both a team and a seller.
Important Note:
- Requiring a seller selection at checkout means this step cannot be skipped by the purchaser and may slow down the purchase process. We recommend only using this setting if every sale must be attributed to a seller.
Editing, Deactivating, or Deleting Sellers
You can edit, deactivate, or delete sellers directly from the Sellers Table. To do so, simply follow the steps below:
- To Edit: Find the seller you want to edit, navigate to the right-most column, and click the Pencil icon.
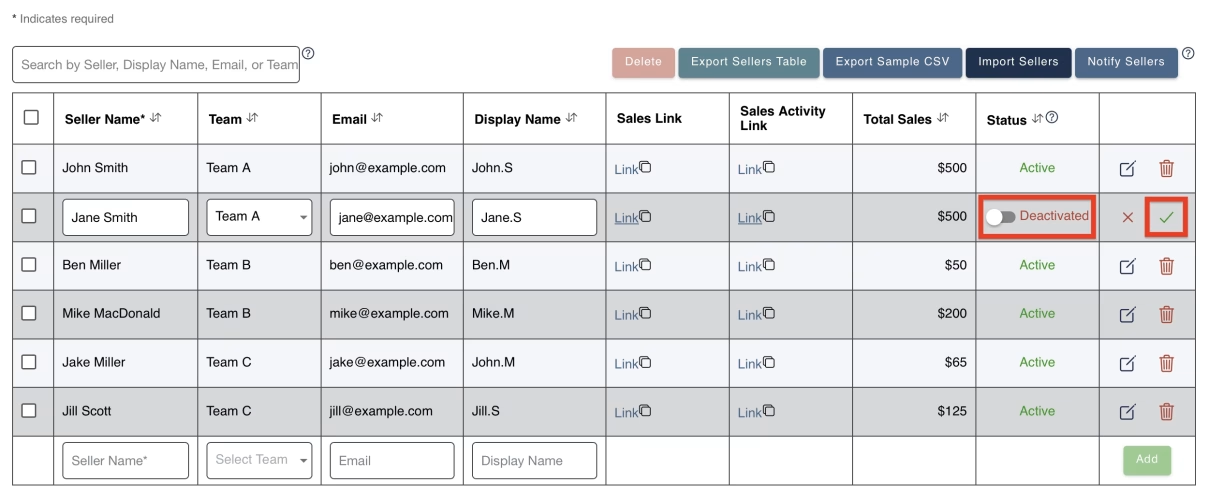
- To Deactivate: Find the seller you would like to deactivate, navigate to the right-most column, and click the Pencil icon. Once in edit mode, under the Status column, switch the toggle to the OFF position. This will switch the seller’s status from ‘Active’ to ‘Deactivated’.
Note: If a seller is deactivated, no new sales can be made in support of them, but all previous sales associated with that seller will remain.
- To Delete: Find the seller you want to delete, navigate to the right-most column, and click the Trash Can icon.
- Bulk Delete: To delete multiple sellers at once, click the checkbox next to their name in the left-most column, then click Delete above the Sellers Table. You can delete multiple sellers by checking off each box before clicking Delete. Selecting the checkbox in the very top-left corner of the Sellers Table will check off all sellers within the Sellers Table. Use the same Delete button above the table if you want to delete all sellers at once.
Getting Started With Teams
Navigate to the Sellers & Teams tab in the Raffle Rocket dashboard, then click on the Teams segment.
Teams Table Overview
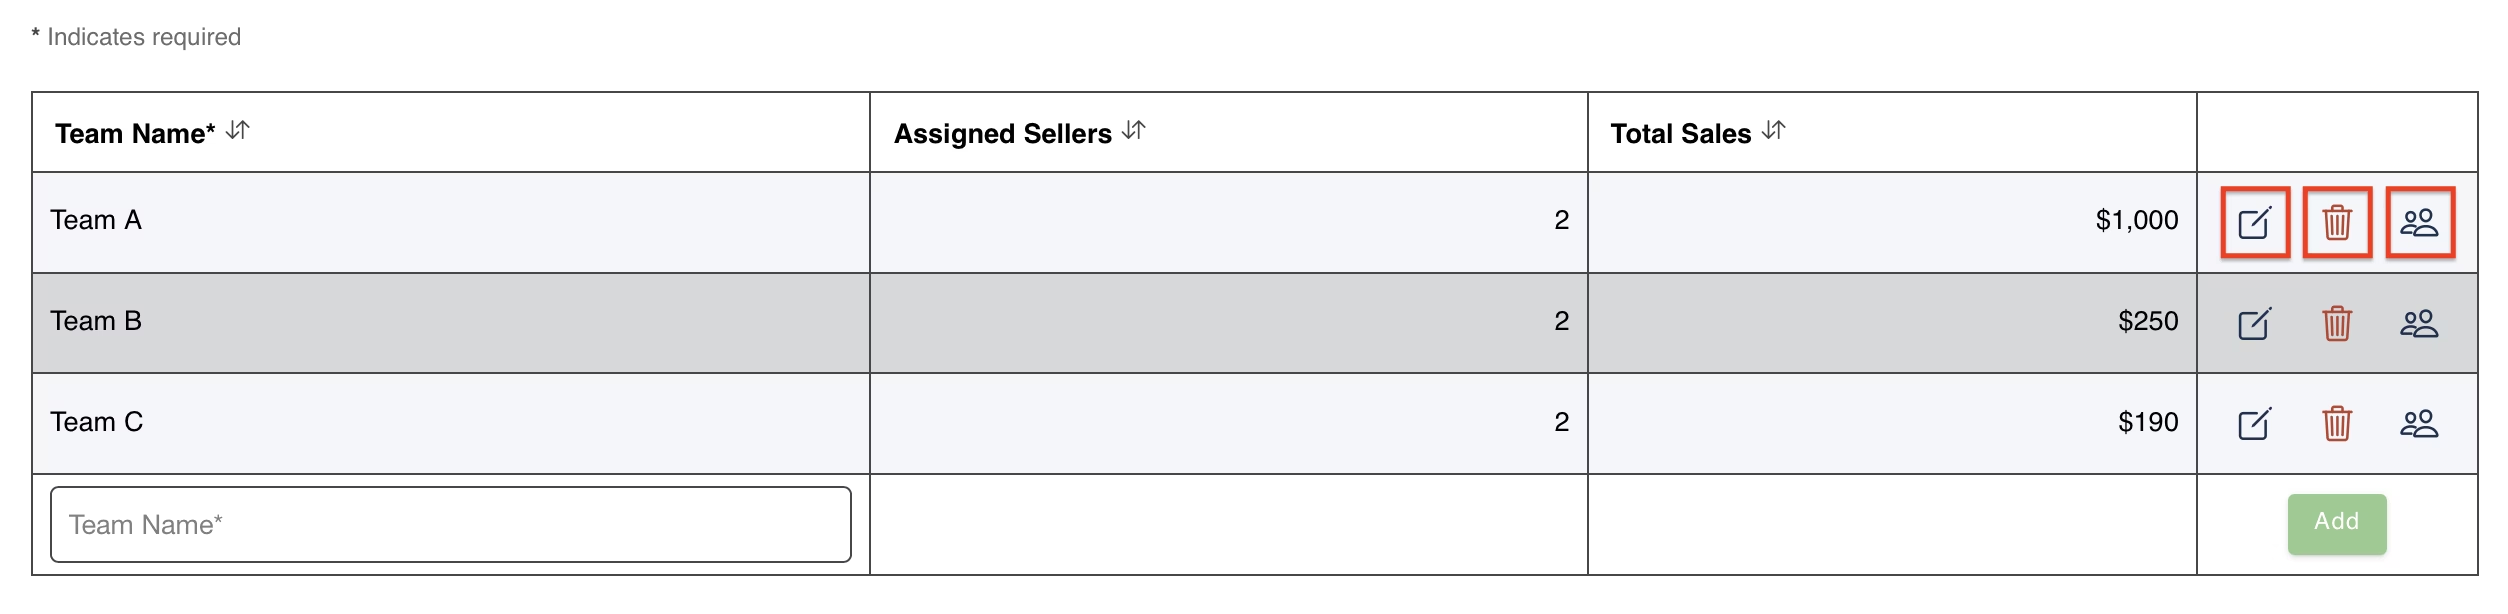
Each row in the Teams Table displays the following:
- Team Name: The name of the team.
- Assigned Sellers: The total number of sellers assigned to the team.
- Total Sales: The total amount raised by all sellers on the team.
Adding Teams
There are three methods for adding teams to a raffle. Keep in mind that Teams are optional, so you can skip this section if you don’t plan on grouping your sellers.
Method 1: Manually Add Teams
From the Teams segment within the Sellers & Teams tab, navigate to the bottom of the Teams Table, enter the Team Name, and click Add.

Method 2: From Sellers Table
While adding or updating sellers from the Sellers Table, you can also create a new team. To do so, navigate to the Team column, click on the Select Team dropdown field, then select the Create New Team option.

Method 3: Import Sellers
As covered in the above sections, you can include team names in your .CSV file during the seller import process. If the import is successful, all imported teams will automatically appear in the Teams Table.
Editing and Managing Teams
- Edit Team Name: Navigate to the team you want to edit and click the Pencil icon.
- Delete a Team: Navigate to the team you want to delete and click the Trash Can icon.
- Note: Any sellers assigned to the deleted team will be moved to a team called, Unassigned. If all teams are deleted, purchasers will only be able to select sellers from the Supporting a Seller? section (more on this down below).
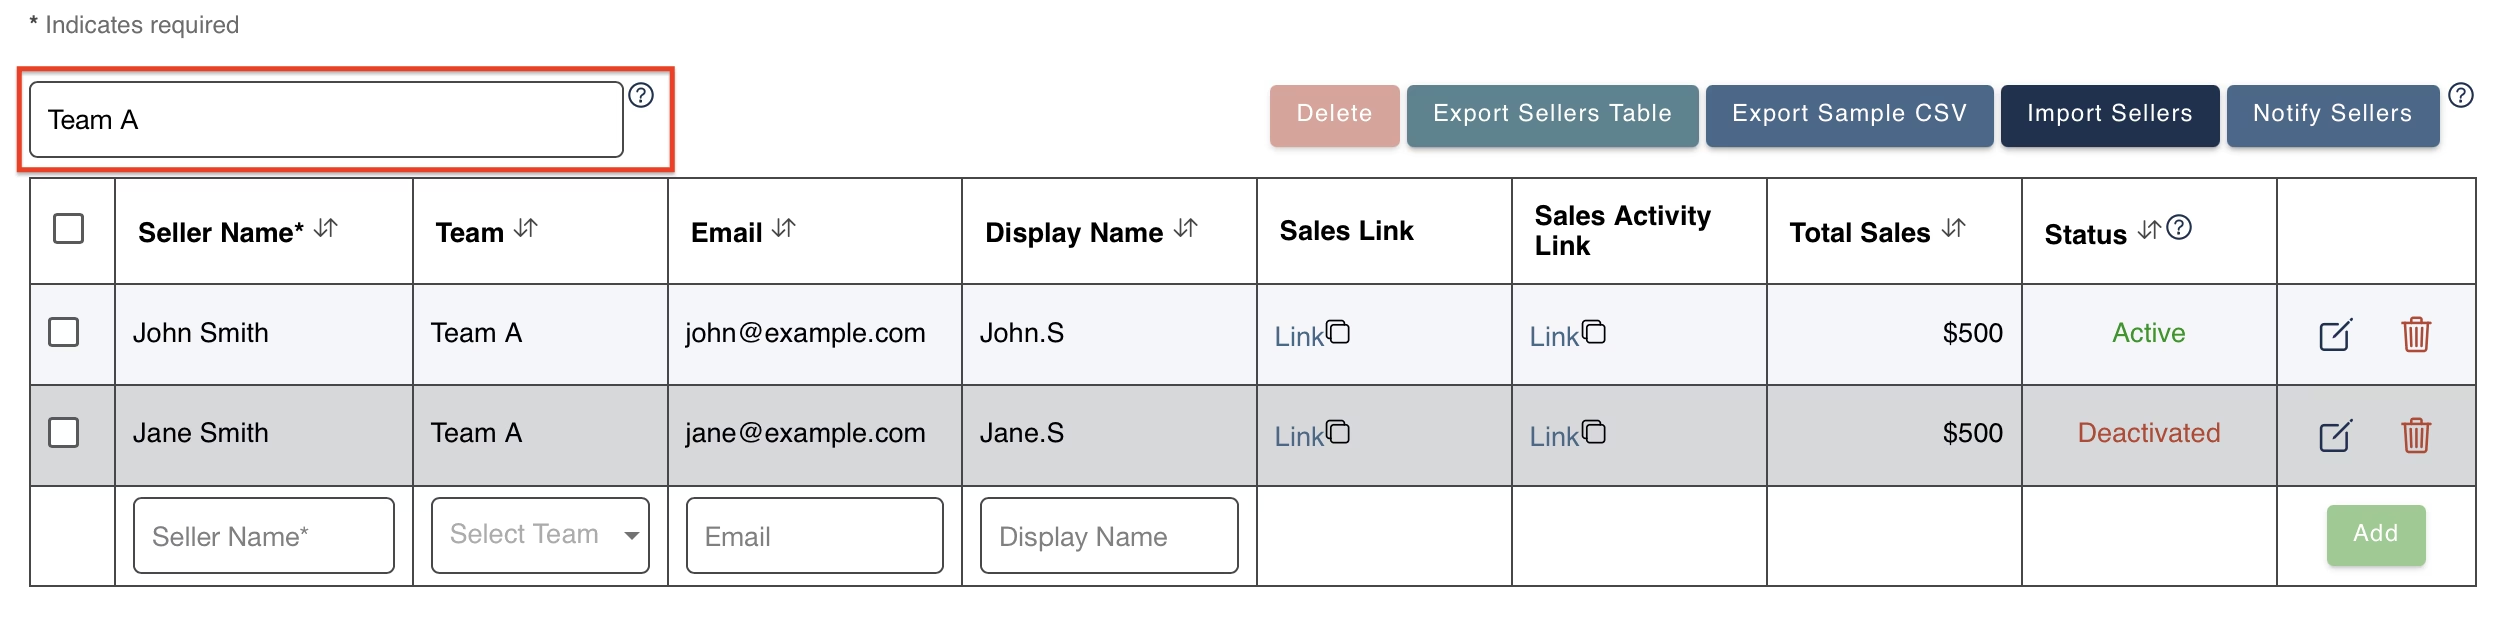
- View Assigned Sellers: Navigate to the team you want to view and click the People icon. You will be redirected to the Sellers segment where the Sellers Table will be filtered to the specific team you clicked on.
The ‘Unassigned’ Team
If some sellers are assigned to a team and others are not, the system will notify you to ensure consistency in your setup. The sellers who do not belong to a team will appear under the system-generated team called “Unassigned” during checkout.

How to Change or Assign a Seller to a Purchase
There are a number of situations where you may need to change the seller associated with a purchase. For example, if no seller was selected at checkout (a Direct sale), or if the wrong seller was chosen. In these cases, administrators can reassign the purchase to a different seller or mark it as a Direct sale. To do this:
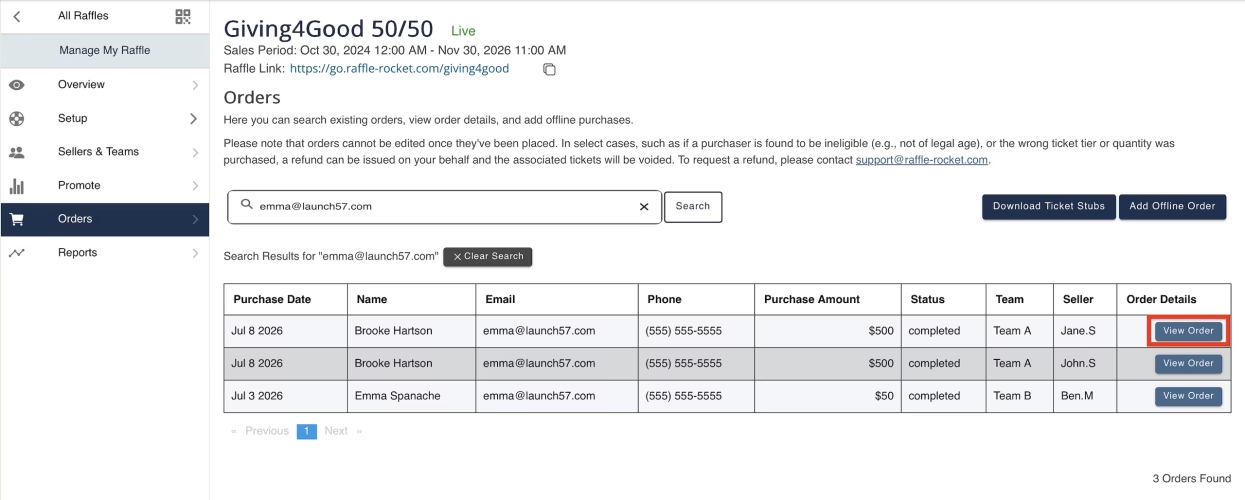
- Navigate to the Orders tab within your raffle’s dashboard.
- Find the order you want to update and select View Order.
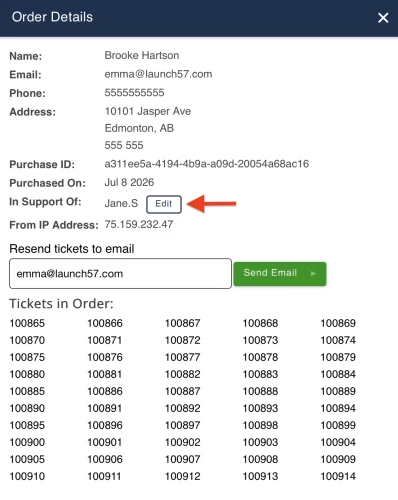
- On the Order Details modal, select the Edit button next to the ‘In Support Of:’ field.
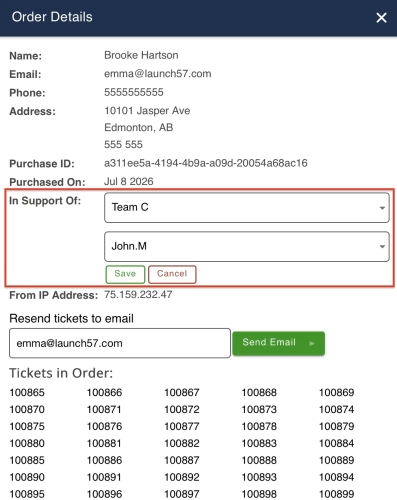
- Under the Seller Name dropdown, choose the correct seller’s name or select the organization name to attribute the sale as a direct sale. If you have Teams configured, you will also be prompted to select the team the seller is assigned to.
- Click Save to confirm the changes. Once your changes have been saved, this sale will be attributed to the new seller. The seller revenue will update automatically throughout the dashboard, ensuring all sales tables and reports are up to date with the most accurate information.
Important Note:
- Sales cannot be assigned to a deactivated seller. To reassign an existing sale to a deactivated seller, the seller must first be reactivated.